![]()
Installation and usage
DSP-TOOLS is a Python package with a command line interface that helps you interact with a DSP server. The DSP server you interact with can be on a remote server, or on your local machine. The following paragraphs give you an overview of how to install and use dsp-tools.
Installation
To install the latest version, run:
pip3 install dsp-tools
To update to the latest version run:
pip3 install --upgrade dsp-tools
Create a project on a DSP server
dsp-tools create [options] project_definition.json
The following options are available:
-s|--server(optional, default:0.0.0.0:3333): URL of the DSP server-u|--user(optional, default:root@example.com): username used for authentication with the DSP API-p|--password(optional, default:test): password used for authentication with the DSP API-V|--validate-only(optional): If set, only the validation of the JSON file is performed.-l|--lists-only(optional): If set, only the lists are created. Please note that in this case the project must already exist.-v|--verbose(optional): If set, more information about the progress is printed to the console.-d|--dump(optional): If set, dump test files for DSP-API requests.
The command is used to read the definition of a project with its data model(s) (provided in a JSON file) and create it
on the DSP server. The following example shows how to upload the project defined in project_definition.json to the DSP
server https://admin.dasch.swiss:
dsp-tools create -s https://api.dasch.swiss -u root@example.com -p test project_definition.json
The expected JSON format is documented here.
Get a project from a DSP server
dsp-tools get [options] output_file.json
The following options are available:
-s|--server(optional, default:0.0.0.0:3333): URL of the DSP server-u|--user(optional, default:root@example.com): username used for authentication with the DSP API-p|--password(optional, default:test): password used for authentication with the DSP API-P|--project(mandatory): shortcode, shortname or IRI of the project-v|--verbose(optional): If set, some information about the progress is printed to the console.
The command is used to get the definition of a project with its data model(s) from a DSP server and write it into a JSON
file. This JSON file can then be used to create the same project on another DSP server. The following example shows how
to get a project from the DSP server https://admin.dasch.swiss.
dsp-tools get -s https://api.dasch.swiss -u root@example.com -p test -P my_project output_file.json
The expected JSON format is documented here.
Upload data to a DSP server
dsp-tools xmlupload [options] xml_data_file.xml
The following options are available:
-s|--server(optional, default:0.0.0.0:3333): URL of the DSP server-u|--user(optional, default:root@example.com): username used for authentication with the DSP API-p|--password(optional, default:test): password used for authentication with the DSP API-i|--imgdir(optional, default:.): path to the directory where the bitstream objects are stored-S|--sipi(optional, default:http://0.0.0.0:1024): URL of the SIPI IIIF server-I|--incremental(optional) : If set, IRIs instead of internal IDs are expected as reference to already existing resources on DSP-V|--validate(optional): If set, the XML file will only be validated, but not uploaded.-v|--verbose(optional): If set, more information about the process is printed to the console.-m|--metrics(optional): If set, write metrics into a "metrics" folder in the current working directory
The command is used to upload data defined in an XML file onto a DSP server. The defaults are intended for local testing:
dsp-tools xmlupload xml_data_file.xml
will upload the XML file on localhost for local viewing. It assumes that DSP-API has been started up with the default
settings, and that potential <bitstream> tags contain file paths that are relative to the working directory from where
dsp-tools is called from.
When uploading data to a remote DSP server, there are three relevant URLs you should know about:
- Subdomain
adminstands for the DSP-APP frontend that you look at in your browser - Subdomain
apistands for the DSP-API (where dsp-tools sends its data to) - Subdomain
iiifstands for the SIPI-server interface (where dsp-tools sends the multimedia files to)
This means that for uploading data to a DSP server on the domain dasch.swiss, you have to type the following:
dsp-tools xmlupload -s https://api.dasch.swiss -u root@example.com -p test -S https://iiif.dasch.swiss xml_data_file.xml
The expected XML format is documented here.
An internal ID is used in the <resptr> tag of an XML file to reference resources inside the same XML file. Once data
is uploaded to DSP, it cannot be referenced by this internal ID anymore. Instead, the resource's IRI has to be used.
After a successful xmlupload, the mapping of internal IDs to their respective IRIs is written to a file
called id2iri_mapping_[timstamp].json.
See dsp-tools id2iri for more information about how
to use this file to replace internal IDs in an existing XML file to reference existing resources.
Create a JSON project file from Excel files
dsp-tools excel2json data_model_files project.json
The expected file and folder structures are described here.
Create the "lists" section of a JSON project file from Excel files
dsp-tools excel2lists [options] folder output.json
The following options are available:
-v|--verbose(optional): If set, more information about the progress is printed to the console.
The expected Excel format is documented here.
Tip: The command excel2json might be more convenient to use.
Create the "resources" section of a JSON project file from an Excel file
dsp-tools excel2resources excel_file.xlsx output_file.json
The command is used to create the resources section of an ontology from an Excel file. Therefore, an Excel file has to be provided with the data in the first worksheet of the Excel file.
The expected Excel format is documented here.
Tip: The command excel2json might be more convenient to use.
Create the "properties" section of a JSON project file from an Excel file
dsp-tools excel2properties excel_file.xlsx output_file.json
The command is used to create the properties section of an ontology from an Excel file. Therefore, an Excel file has to be provided with the data in the first worksheet of the Excel file.
The expected Excel format is documented here.
Tip: The command excel2json might be more convenient to use.
Create an XML file from Excel/CSV
If your data source is already structured according to the DSP specifications, but it is not in XML format yet, the
command excel2xml will transform it into XML. This is mostly used for DaSCH-interal data migration.
dsp-tools excel2xml data-source.xlsx project_shortcode ontology_name
Arguments:
- data-source.xlsx (mandatory): An Excel/CSV file that is structured as explained below
- project_shortcode (mandatory): The four-digit hexadecimal shortcode of the project
- ontology_name (mandatory): the name of the ontology that the data belongs to
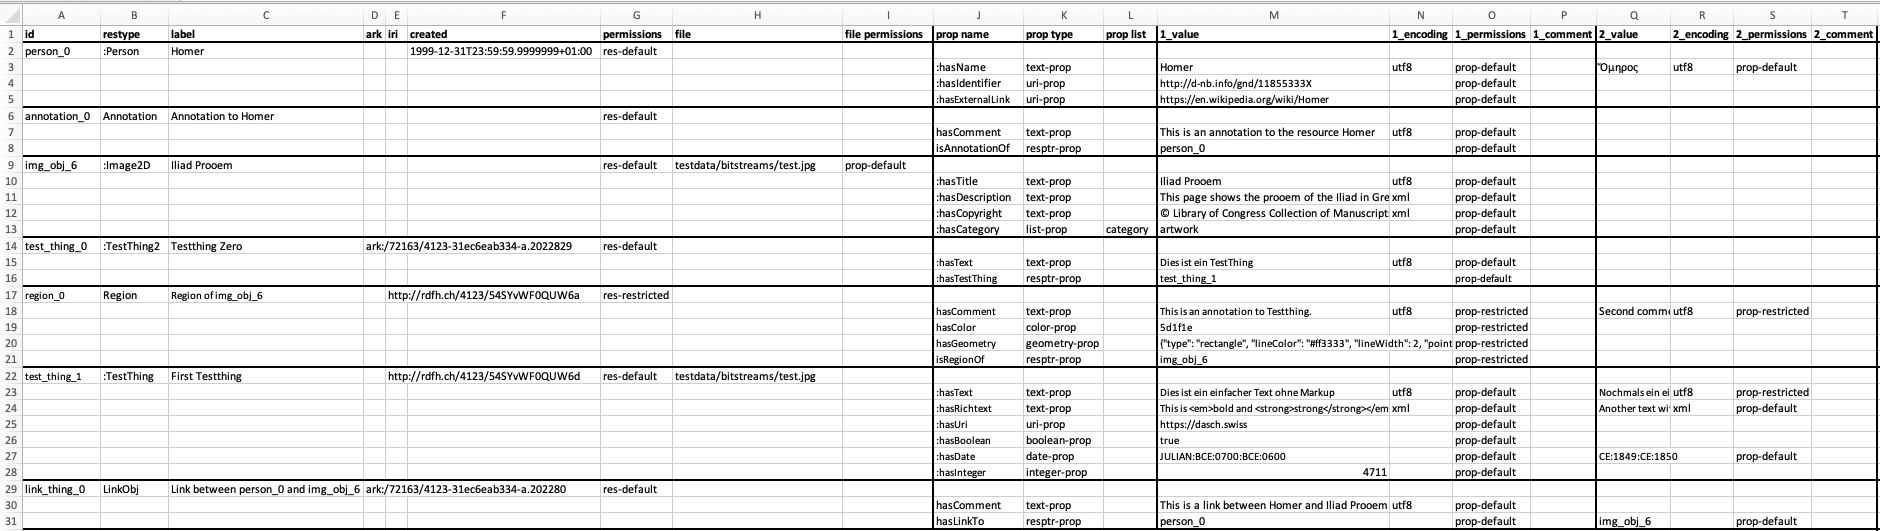
The Excel file must be structured as in this image:
Some notes:
- The special tags
<annotation>,<link>, and<region>are represented as resources of restypeAnnotation,LinkObj, andRegion. - The columns "ark", "iri", and "creation_date" are only used for DaSCH-internal data migration.
- If
fileis provided, but nofile permissions, an attempt will be started to deduce them from the resource permissions (res-default-->prop-defaultandres-restricted-->prop-restricted). If this attempt is not successful, aBaseErrorwill be raised.
If your data source is not yet structured according to the DSP specifications, you need a custom Python script for the
data transformation. For this, you might want to import the module excel2xml into your Python script, which is
described in the next paragraph.
Use the module excel2xml to convert a data source to XML
dsp-tools assists you in converting a data source in CSV/XLS(X) format to an XML file. Unlike the other features of
dsp-tools, this doesn't work via command line, but via helper methods that you can import into your own Python script.
Because every data source is different, there is no single algorithm to convert them to a DSP conform XML. Every user
has to deal with the specialties of his/her data source, but excel2xml's helper methods can help a lot. Read more
about it here.
Replace internal IDs with IRIs in XML file
dsp-tools id2iri xml_file.xml mapping_file.json --outfile xml_out_file.xml
When uploading data with dsp-tools xmlupload an internal ID is used in the <resptr> tag of the XML file to reference
resources inside the same XML file. Once data is uploaded to DSP it cannot be referenced by this internal ID anymore.
Instead, the resource's IRI has to be used.
With dsp-tools id2iri internal IDs can be replaced with their corresponding IRIs within a provided XML. The output is
written to a new XML file called id2iri_replaced_[timestamp].xml (the file path and name can be overwritten with
option --outfile). If all internal IDs were replaced, the newly created XML can be used
with dsp-tools xmlupload --incremental id2iri_replaced_20211026_120247263754.xml to upload the data.
Note that internal IDs and IRIs cannot be mixed. The input XML file has to be provided as well as the JSON file which
contains the mapping from internal IDs to IRIs. This JSON file is generated after each successful xmlupload.
In order to upload data incrementally the procedure described here is recommended.
Start a DSP stack on your local machine
DSP-API is the heart of the DaSCH service platform. It is a server application for storing data from the Humanities. DSP-APP is a generic user interface for the user to look at and work with data stored in DSP-API. It's a server application, too. For testing purposes, it is sometimes necessary to run DSP-API and DSP-APP on a local machine. There are two ways to do this:
- simple: run
dsp-tools start-stack - advanced: execute commands from within the DSP-API/DSP-APP repositories
Here's an overview of the two ways:
| simple | advanced | |
|---|---|---|
| target group | researchers, RDU employees | developers of DSP-API or DSP-APP |
| how it works | run dsp-tools start-stack |
execute commands from within locally cloned DSP-API/DSP-APP repositories |
| software dependencies | Docker, Python, dsp-tools | XCode command line tools, Docker, sbt, Java, Angular, node, yarn |
| mechanism in the background | run pre-built Docker images | build DSP-API and DSP-APP from a branch in the repository |
| available versions | latest released version | any branch, or locally modified working tree |
| caveats | dependencies must be kept up to date |
Simple way: dsp-tools start-stack
This command runs Docker images with the latest released versions of DSP-API and DSP-APP, i.e. the versions that are running on https://admin.dasch.swiss. The only prerequisite for this is that Docker is running, and that you have Python and dsp-tools installed. Just type:
dsp-tools start-stack
dsp-tools will ask you for permission to clean Docker with a docker system prune. This will remove all unused
containers, networks and images. If you don't know what that means, just type y ("yes") and then Enter.
The following options are available:
--max_file_size=int(optional, default:250): max. multimedia file size allowed by SIPI, in MB (max: 100'000)--prune(optional): if set, executedocker system prunewithout asking the user--no-prune(optional): if set, don't executedocker system prune(and don't ask)
Example: If you start the stack with dsp-tools start-stack --max_file_size=1000, it will be possible to upload files
that are up to 1 GB big. If a file bigger than max_file_size is uploaded, SIPI will reject it.
When your work is done, shut down DSP-API and DSP-APP with
dsp-tools stop-stack
This command deletes all Docker volumes, and removes all data that was in the database.
Some notes:
- As long as you want to keep the data in the database, don't execute
dsp-tools stop-stack. - It is possible to leave DSP-API up for a long time. If you want to save power, you can pause Docker. When you resume it, DSP-API will still be running, in the state how you left it.
- You can also send your computer to sleep while the DSP stack is running. For this, you don't even need to pause Docker.
- This command was developed for DaSCH-internal use only. We don't offer support or troubleshooting for it.
When should I restart DSP-API?
After creating a data model and adding some data in your local DSP stack, you can work on DSP as if it was the live platform. But there are certain actions that are irreversible or can only be executed once, e.g. uploading the same JSON project file. If you edit your data model in the JSON file, and then you want to upload it a second time, DSP-API will refuse to create the same project again. So, you might want to restart the stack and start over again from a clean setup.
It is possible, however, to modify the XML data file and upload it again and again. But after some uploads, DSP is cluttered with data, so you might want to restart the stack.
Advanced way
If you want to run a specific branch of DSP-API / DSP-APP, or to modify them yourself, you need to:
- install the dependencies (check https://github.com/dasch-swiss/dsp-api and https://github.com/dasch-swiss/dsp-app how to do it)
- keep the dependencies up to date (keep in mind that dependencies might be replaced over time)
- clone the repositories from GitHub
- keep them up to date with
git pull - execute commands from within the repositories (
makefor DSP-API,angularfor DSP-APP) - take care that the repositories don't get cluttered with old data over time